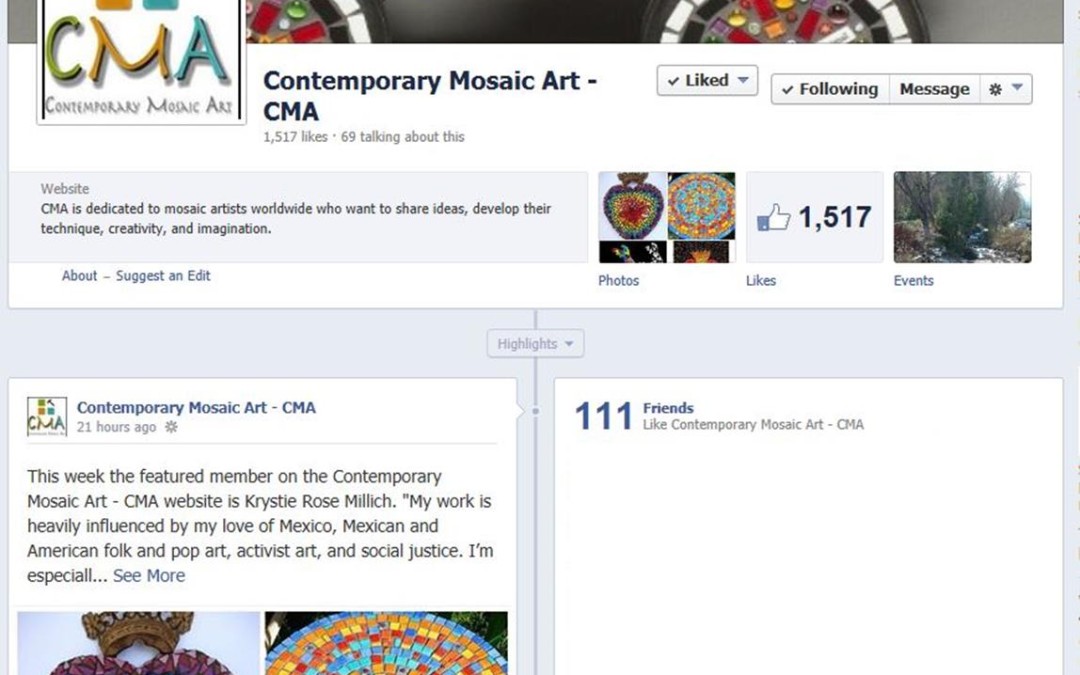
Tile Mosaic Girl

Tile, Glass, and Mixed Media Mosaic Artwork, Classes, Open Studio Time, and Supply Shop. TileMosaicGirl, local Superhero, is here to help YOU learn all you can about mosaics, and not the way she did; you will learn without all the trial and error she went through, because YOU will have learned from her mistakes! Follow her adventures here and learn some great mosaic stuff!
  • scissors
    February 11th, 2011adminMosaic Classes, Mosaic How-To's

    I just wanted to let those of you that have asked know that I am ‘almost’ ready to go ‘live’ with the online registration functions for my classes. Of course, wouldn’t ya know it?; it’s taken MUCH longer than you think it’s going to (uh, especially when the person working on the code/programming part is really an Artist/Teacher/Social Worker kinda chick!). I’ve called in my reinforcements and we’re almost ready; hopefully I’ll post that it’s ready to go here in the next few days. Until then, thank you for your patience.

    Also: Another Class Added at the new TileMosaicGirl at Pot-Luck, the Pottery Painting Place:

    Mosaic Jewelry: Wednesday, April 6, 2011 from 5:30-8:30 pm  (see “Classes” pages for full descriptions and more information, with online registration links in the next few days).

    Evening & Weekend Open Studio Times Added for March:

    Sunday, March 20, 1 – 4 pm      AND     Wednesday, March 23, 4:30 – 8:30 pm

    * Please Note: You can always email me to arrange for Open Studio Time by Appointment if these days/hours don’t meet your needs.

    Tempered Glass Mosaic by Artist Ellen Blakeley, http://www.ellenblakeley.com

    Share
    Tags: , , , , , , , , , , , ,
  • scissors

    I’ll be posting LOTS of photos, information, ‘reports’, suppliers, and resources from the 2010 Society of American Mosaic Artists conference I attended in Chicago the week before last, starting with this short report…

    I’m happy to report that my Art Salon piece, titled, “The Unknown” (question mark mosaic in pic; not the white background; that’s supposed to represent how it would hang on a wall; better pic of it on my Gallery page), sold to a gallery in Canada, outside Toronto, the Maplestone Gallery; www.maplestonegallery.com! Yey! SO Fun! I see a lot of their stuff is very bright like my piece, which makes it interesting.  I also see that they offer a variety of mosaic classes, in case you’re able to attend.  Check them out; I met Aiken, the co-owner along with Suzanne (who looks like she does FAB mosaic work), and he was really nice! I bet their classes are great! I see they are also offering a special visiting Artist workshop with wonderful mosaic artist Carol Shelkin in August; sign up now; she is VERY popular and her work is fantastic (see her piece below from the Mosaic Art International 2010 Exhibition)!  Anyone who’s attended or knows the gallery, please feel free to post your feedback here!

    "Fabulous Hair" by Carol Shelkin

    Share
    Tags: , , , , , , , , , , , ,
  • scissors

    Beautiful "Fireworks" clock by mosaic artist Linda P. Smith

    Garden stone from MosaicSmith on etsy

    Thought I’d take a minute to continue sharing some of the wonderful mosaic artists I’ve found along my “journey”…

    The latest I’d like to share is Linda Smith at  MosaicSmith Mosaics…Linda is an artist out of one of my favorite areas of the country for beaches; Tampa, FL.  Linda is a mostly self-taught mosaicist, like me, who makes and sells wonderful functional and decorative pieces, available through her etsy store.  I’ve included photos of some of my favorite pieces of hers above; the bright colors on the clock and the garden stone are SOOOOoooo up my alley!  She also does mosaic jewelry, custom pieces, and installations.  Linda writes a  wonderful mosaic blog and I was honored when she recently referred to my blog post (and photos) on issues w/ glass gems and grouting in her blog.  She shares a lot of great information on her blog; it is a wonderful resource for all things mosaic!  You can also find Linda on Twitter @MosaicSmith (http://twitter.com/MosaicSmith), Flickr, and Indiepublic, an online community for independent artists/crafters and art & craft lovers. 

    Share
    Tags: , , , , , , , , , , , , , , , , , ,
  • scissors

    I’m so excited, and I just can’t hide it…Less than two weeks now until the 2010 SAMA (Society of American Mosaic Artists) Conference in Chicago!  SAMA is an organization for mosaic artists and fans, from those just beginning to discover mosaics to those that are seasoned professionals.  Of course, I’m kind of the “just beginning” end, so, this is my first conference!  I’m looking forward to meeting lots of other mosaicists (yeah; it’s kinda a word!), learning lots of new things, ‘networking’, and checking out the VENDOR marketplace!  Thank God, I’m flying SW, where they don’t charge for bags, b/c I’m bringing a whole empty one for lots of new GOODIES!!!

    The photo above (titled, “The Unknown”) is a piece I’ve submitted for the Art Salon/Auction at the show; we’ll see how it does!  I’ll also be volunteering on the ‘Mosaic Marathon’, where we all contribute to the making of a huge mosaic installation to donate to a local domestic violence shelter.  It will be so fun to actually be designing & breaking & gluing some sh*t down w/other mosaicists!  I think the conference will provide some great inspiration, skills, and information to both inspire my work and add to my class content for my students.  I don’t know if I’ll be able to go every year, but I’m at least glad to be able to go now, at this more ‘beginning’ time as a mosaicist!  For anyone out there who’s familiar w/ SAMA and wants information and/or reports on the conference and its activities, I’ll be doing some posting (hopefully during, but definitely after) and can answer any questions you might have.  If you’re not familiar w/ SAMA and you’re looking for some information on mosaics, supplies, classes, artists, designers, etc., see their website  for all kinds of resources!

    Share
    Tags: , , , , , ,
  • scissors

    For anyone interested in learning how to do mosaics, especially anyone interested in figuring out, “what the heck grout color should I use on this thing?!”, I found the COOLEST free online tool that can help you to choose grout colors for your mosaic piece; check it out..(Also; they hae all kinds of other helpful info. & links on this excellent site out of the U.K.)…

    http://www.thejoyofshards.co.uk/projects/pr2mirr.shtml

    Share
    Tags: , , , , , , , , ,
  • scissors

    Today, I was prepping some paper-backed tile sheets that I had ordered online (Gems on the Rocks store on ebay) to get them separated into colors and ready in their jars for the next masterpiece (heh! heh!).  I was thinking that it might be helpful to take some photos and share a narrative of working with these kinds of tiles for those of you out there who have asked me about how you “deal” with tiles that come on paper or mesh-backed sheets.

    Often, it is easier for a tile manufacturer to mount small tiles onto sheets of paper or mesh rather than trying to count, sort, and ship them in their  3/4″ to 3″  individual pieces.  Also; many tile layers, homeowners, and mosaic artists use the tiles’ sheets to hold the tiles together so that they can be mounted evenly and in larger sections (usually 12″x12″) than with individual little tiny tiles.  If you are interested in mounting tiles by the sheet, there are LOTS of websites and books out there about how to correctly do so.  Today, I’m not going to be addressing those mounting needs, but, rather, when one needs to work with the individual tiles that are mounted on paper or mesh-backed sheets.

    I’ll start with paper-backed sheets of tiles; the tiles are mounted onto brown ‘kraft’ paper with a standard white glue that is meant for removal purposes (in the case of mounting whole sheets at once, the paper is removed as the last step of the tile application, just before grouting).  Therefore, the tiles easily come off the paper sheets; easier than you would ever realize if you didn’t know better.  Here I will refer to the step-by-step photos of the process I follow…

    Small sheets of tile in Soaker Tub

    1) The first photo shows several small sheets (4″x4″?) of 3/4″ glass vitreous tiles, which are often used in mosaics.  Usually, you will see these tiles mounted to sheets of 12″x12″ paper; these just happened to be “sample” sheets of colors from Gems on the Rocks.  I arrange several in either the tub, a sink, or a portable soaker tub like this one here, that I paid a whole $1 for at where else; Dollar Tree! I like the portable nature because I can sit the tub wherever I want and not take up (real) tub or sink room or get gucky water in them.  Some people say to never soak several colors at once because then you’ll have to sort the colors afterward, to put into containers, but–I’d rather make fewer trips to the bath or whatever area I’m soaking them in, and then sort them quickly afterward than make a million trips back & forth to soak each tile color separately.  It really depends on how many different tile colors you are dealing with; if it is just a few, then separate “soaks’ makes sense to me.

    Tile Sheets Soaking in (Soapy) Tub

    2) Put 4-5 squirts of a regular liquid hand or dish soap and enough hot water to fill the container about 2/3 full.  Let tiles sit and soak for about 1-2 hours.

    Tiles not ready to come off paper Sheets

    3) After soaking, grab a sheet of tiles and see if they easily come off the backer paper (they should basically slide right off and not leave any backer paper remnants on the backs of the tiles).  If not (like in photo above), let soak for another hour or so and maybe add hot water (this doesn’t happen very often if you follow the aforementioned directions).

    Sheets where the tiles easily came off

    4) Once you’ve taken all the (now-blank) paper sheets out of the soaking bin and thrown them away, you can now pour off all of the water in the bin (or drain the tub or sink).  (See photo below.)  Be careful to have a drain guard so that you don’t have tiles going down the drain when you do this!  The tiles will remain on the bottom of whatever container for the most part, because they are heavier than the water and will sink.

    Pouring water out of soaking tub (tiles at bottom)

    Tiles laid out on bath mat to dry

    5) Next, after I’ve drained all the excess water from the tub or sink, I spread the wet tiles out onto my cushioned bath mat in the tub (this protects both the tub’s surface and the tiles themselves from inadvertently breaking ).  You could also lay them out on a towel or, if you’re really in a hurry or impatient or just kinda happily OCD, you can take a towel and dry each and every one right away!  What –I– do, though, is leave them to dry for several hours; how long depends on if you’re in a place like dry Colorado, like I am, or someplace a little more “wet”, like, say, the Pacific Northwest (heh!heh!; let’s see who comments on THAT one!).

    Pretty, pretty dried tiles, getting ready to be sorted into jars

    6) The picture above shows my dried tiles ready to be sorted by color into their respective containers.  For tile-storing purposes, you can use almost any containers you want, but I REALLY recommend using ones that are CRYSTAL CLEAR; I initially made the mistake of getting some that weren’t totally clear and it was a pain in the a*s to try to peer through the container to see what color the tiles were.  I use a LOT of recycled containers; jars are excellent; food jars, health & beauty products, etc.  Because we don’t eat enough on a constant basis to support an all-recylced militia of containers, I have bought others at garage sales, thrift stores, and the dollar store.

    Glass mosaic tiles on a mesh-backed sheet

    7) Oftentimes, small tiles will also come on mesh-backed sheets (almost always in 12″x12″ sheets).  The photo above shows an example of some glass mosaic tiles that came on a mesh-backed sheet.  See the photo below for the mesh backside of these tiles:

    Mesh backside of glass mosaic tiles

    8) So, with mesh-backed tiles, you can follow the same steps as for paper-backed tiles to remove the individual tiles, though you may need to use more soap, hotter water, and soak them for longer (but not necessarily).  However, I don’t even worry about the soaking for the mesh-backed ones; I just cut them away from each other with scissors.  This is a great option for, say, using a patterned tile sheet like the one above to make strips or a border and not have to lay out every single, individual tile.  This also saves you the time and effort of the whole soaking/drying/sorting process and allows you to store the sheets flat rather than to add more containers to your collection (which is like having a bunch of candy jars everywhere, which I love, but, that’s another topic!)  I just make sure to cut as close to the bottom edges of the tile as possible with my scissors or box knife, so that there isn’t any of the mesh bits to stick up through my adhesive or grout and subsequently show up in my finished piece (NOT pretty!).  The photo below shows me cutting the tile sheet with normal scissors.

    Cutting tiles from mesh-backed sheet

    As usual, I hope this has been helpful, and, if you have any related tips or cautions you’d like to add, please do!  Also, always feel free to post any related questions you might have; I’ll give you the ‘ol teacher’s mantra; “There are no dumb questions” and, “If you have a question, there are probably several others who have the same question.”

    Share
    Tags: , , , , , , , , , , , ,
  • « Older Entries